
When most people think of vinyl flooring, they picture it underfoot, in kitchens, bathrooms, and hallways.
But lately, a design trend is flipping that expectation on its head. More homeowners and designers are asking: Can vinyl flooring be used on walls?
The answer is yes, and not only is it possible, but it can also be a smart, stylish, and affordable option for interior upgrades.
In this article, we’ll explain how and why vinyl flooring can be used on walls, what types work best, how to install it properly, and what to watch out for.
Why People Are Using Vinyl Flooring on Walls
Vinyl flooring has evolved dramatically over the years. Once known for its low-budget look, today’s vinyl planks and tiles come in a wide range of realistic wood, stone, and tile patterns.
They’re now seen as a modern, versatile material, not just for floors, but also for creative wall treatments.
Here’s why so many people are exploring the idea of using vinyl flooring on their walls:
1. Water Resistance and Durability
One of vinyl flooring’s biggest strengths is its resistance to water and moisture.
That’s why it’s so popular in kitchens, bathrooms, and laundry rooms. When used on walls, these properties are just as valuable.
Vinyl won’t warp, swell, or get damaged the way drywall or wood might in humid environments. It’s a practical option for rooms where splashes, steam, or humidity are common.
2. Design Flexibility
Vinyl flooring is available in thousands of styles, colors, and textures. Want a reclaimed barn wood accent wall without the expense?
Vinyl planks can do that. Prefer the look of classic ceramic tile but don’t want the weight or grout maintenance? Vinyl tiles offer that, too.
Using vinyl on walls gives you more creative control. You can easily mix colors, create patterns, or simulate high-end materials for a fraction of the price.
3. Budget-Friendly Option
Compared to real wood panels, stone tiles, or ceramic, vinyl is much more affordable. Even luxury vinyl planks (LVP) cost significantly less than natural alternatives.
Plus, the material is lightweight and easy to work with, which can reduce labor costs if you’re hiring help, or make a DIY project more manageable.
4. Easy Installation
Many types of vinyl flooring are designed for quick installation, especially peel-and-stick tiles and click-lock planks.
With basic tools and a little preparation, you can apply them to a wall without needing professional equipment. For DIYers, that means saving time and money.
5. Low Maintenance
Vinyl is one of the easiest materials to maintain. There’s no need for special cleaning products or treatments.
A simple wipe with a damp cloth is usually enough to keep it looking fresh, even on walls exposed to cooking splatters or bathroom humidity.
Best Types of Vinyl Flooring for Walls
Not all vinyl is created equal. Some types are better suited for walls than others based on weight, size, and installation method. Here are the top contenders:
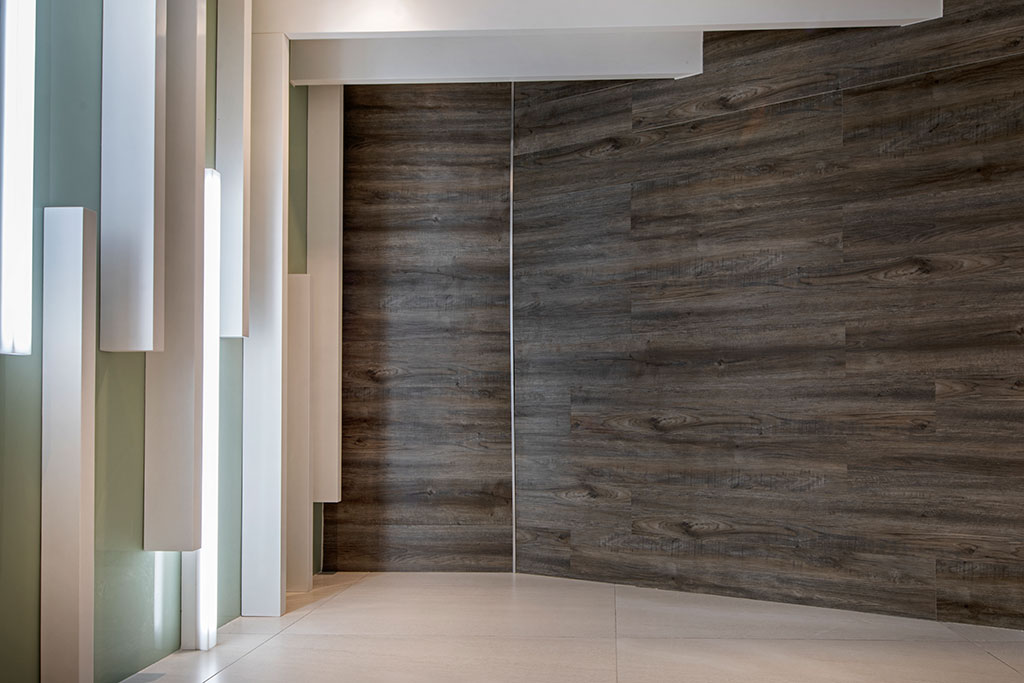
1. Luxury Vinyl Planks (LVP)
These are long, narrow planks that mimic hardwood floors. They’re often installed using a click-lock system, but they can also be glued or nailed to walls.
- Best for: Wood-look accent walls, rustic designs, living rooms, bedrooms.
- Pro tip: Use construction adhesive and finish with molding to create a seamless appearance.
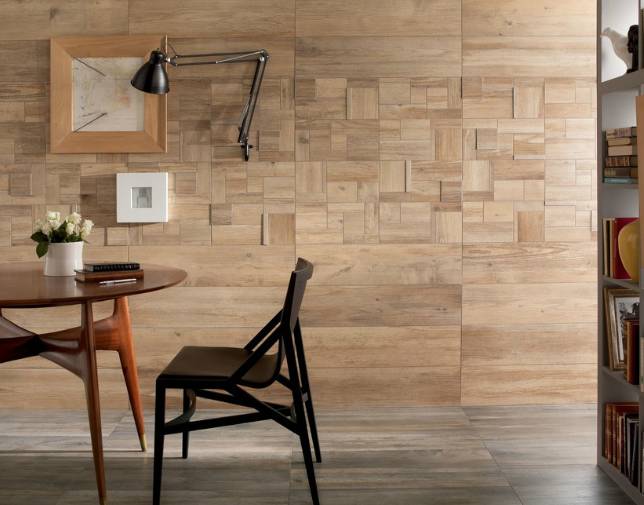
2. Luxury Vinyl Tiles (LVT)
LVTs are square or rectangular tiles that replicate stone, marble, or ceramic finishes. They’re especially effective in areas where you’d expect tile, like backsplashes or bathroom walls.
- Best for: Kitchens, powder rooms, fireplaces, modern spaces.
- Pro tip: Use peel-and-stick versions for an easier installation process.
3. Sheet Vinyl
Sold in large rolls, sheet vinyl can cover large areas without seams. This is useful for completely waterproof surfaces.
- Best for: Utility rooms, commercial kitchens, full wall applications.
- Pro tip: Professional installation is recommended due to the size and complexity.
How to Install Vinyl Flooring on Walls
Installing vinyl flooring on walls follows a different process than installing it on floors, but it’s still accessible to most DIYers. Here’s a simplified step-by-step guide.
Step 1: Prepare the Surface
The first step is preparing the wall surface. This is crucial for ensuring the vinyl sticks properly and stays in place long-term.
Start by cleaning the wall thoroughly to remove any dust, grease, or leftover adhesive.
A clean surface helps the vinyl bond better. If the wall has holes or rough patches, fill them in with spackling compound and sand the surface smooth.
In some cases, especially if you’re using peel-and-stick vinyl, it’s a good idea to apply a primer to enhance adhesion.
Step 2: Plan Your Layout
Next, plan your layout carefully before you start sticking anything to the wall.
Measure the total wall area and calculate the square footage, remembering to account for about 10% extra to cover waste or errors.
Lay out the planks or tiles on the floor first to visualize the pattern and make sure everything aligns properly.
Use a level or chalk line to mark a horizontal guide on the wall, which will help you keep your rows perfectly straight during installation.
Step 3: Apply the Vinyl
When you’re ready to install, the method will depend on the type of vinyl you’re using.
If you’re working with glue-down planks or tiles, use a notched trowel to spread adhesive evenly across the back of the vinyl or directly onto the wall, following the manufacturer’s instructions.
For peel-and-stick vinyl, simply remove the backing paper and press each piece firmly onto the wall, starting from your guide line and working outwards.
Be sure to apply even pressure as you go, using a roller or your hands, to ensure a strong bond and remove any air bubbles.
Step 4: Cut and Trim
As you install the vinyl, you’ll need to cut pieces to fit around outlets, windows, and edges. Use a sharp utility knife and a straight edge to make clean, precise cuts.
For best results, leave a small expansion gap, around 1/8 of an inch, along the edges.
This allows the material to expand and contract slightly with temperature changes without buckling.
Once your vinyl is fully installed, use trim or molding along the top and bottom edges to hide the seams and give the wall a polished, finished appearance.
Step 5: Seal the Edges (Optional)
Finally, in areas exposed to moisture like bathrooms or laundry rooms, consider sealing the edges and seams with a clear waterproof silicone.
This extra step prevents water from seeping behind the vinyl and protects your wall over time.
After everything is in place, allow the adhesive to cure according to the manufacturer’s recommendations before cleaning or decorating.
Common Challenges and Solutions
While using vinyl flooring on walls is generally straightforward, a few common issues can pop up if you’re not careful.
Knowing what to watch for and how to fix it can save you time, money, and frustration during your project.
1. Vinyl Falling Off the Wall
One of the most frequent problems is vinyl falling off the wall shortly after installation.
This usually happens because of improper adhesive or poor wall preparation. If the surface isn’t clean, smooth, and dry, the vinyl may not stick properly, causing it to peel away over time.
To avoid this, always clean the wall thoroughly before starting and consider using a high-quality construction adhesive that’s rated for the weight of vinyl planks or tiles.
For peel-and-stick vinyl, make sure the wall is primed if needed, and press each tile down firmly to ensure a secure bond.
2. Warping or Bubbling
Another issue to watch for is warping or bubbling of the vinyl once it’s installed.
This can be caused by placing vinyl too close to heat sources like ovens, radiators, or direct sunlight, or by failing to press the vinyl down evenly during installation.
To prevent this, avoid installing vinyl in areas exposed to high heat. If you must install near a warm zone, use heat-resistant vinyl products specifically rated for such conditions.
Also, be sure to apply firm, even pressure to remove air pockets and allow the adhesive to cure fully before exposing it to regular use.
3. Difficulty Cutting
Finally, many DIYers run into trouble when it comes to cutting the vinyl.
Difficulty cutting often stems from using dull blades or trying to slice through particularly thick vinyl materials without the right tools.
This can result in jagged edges and an uneven finish. The fix is simple: always use a sharp, fresh utility blade and a metal straight edge to guide your cuts.
This will ensure smooth edges and help the pieces fit together cleanly, giving your vinyl wall a crisp, professional look.
Is Vinyl Safe for Walls?
Yes. As long as the wall is structurally sound and you use the right adhesive, vinyl flooring is safe and effective on most vertical surfaces.
However, avoid placing vinyl near open flames or extremely high heat.
Want Expert Help With Vinyl Installations? Contact Handyz Conceptz!
If you’re inspired to transform your space but don’t want to go it alone, Handyz Conceptz is here to help.
From choosing the best vinyl material to professional installation tips and sourcing, our team can guide you every step of the way.
Reach out to Handyz Conceptz now to bring your vinyl wall project to life with confidence, precision, and style.